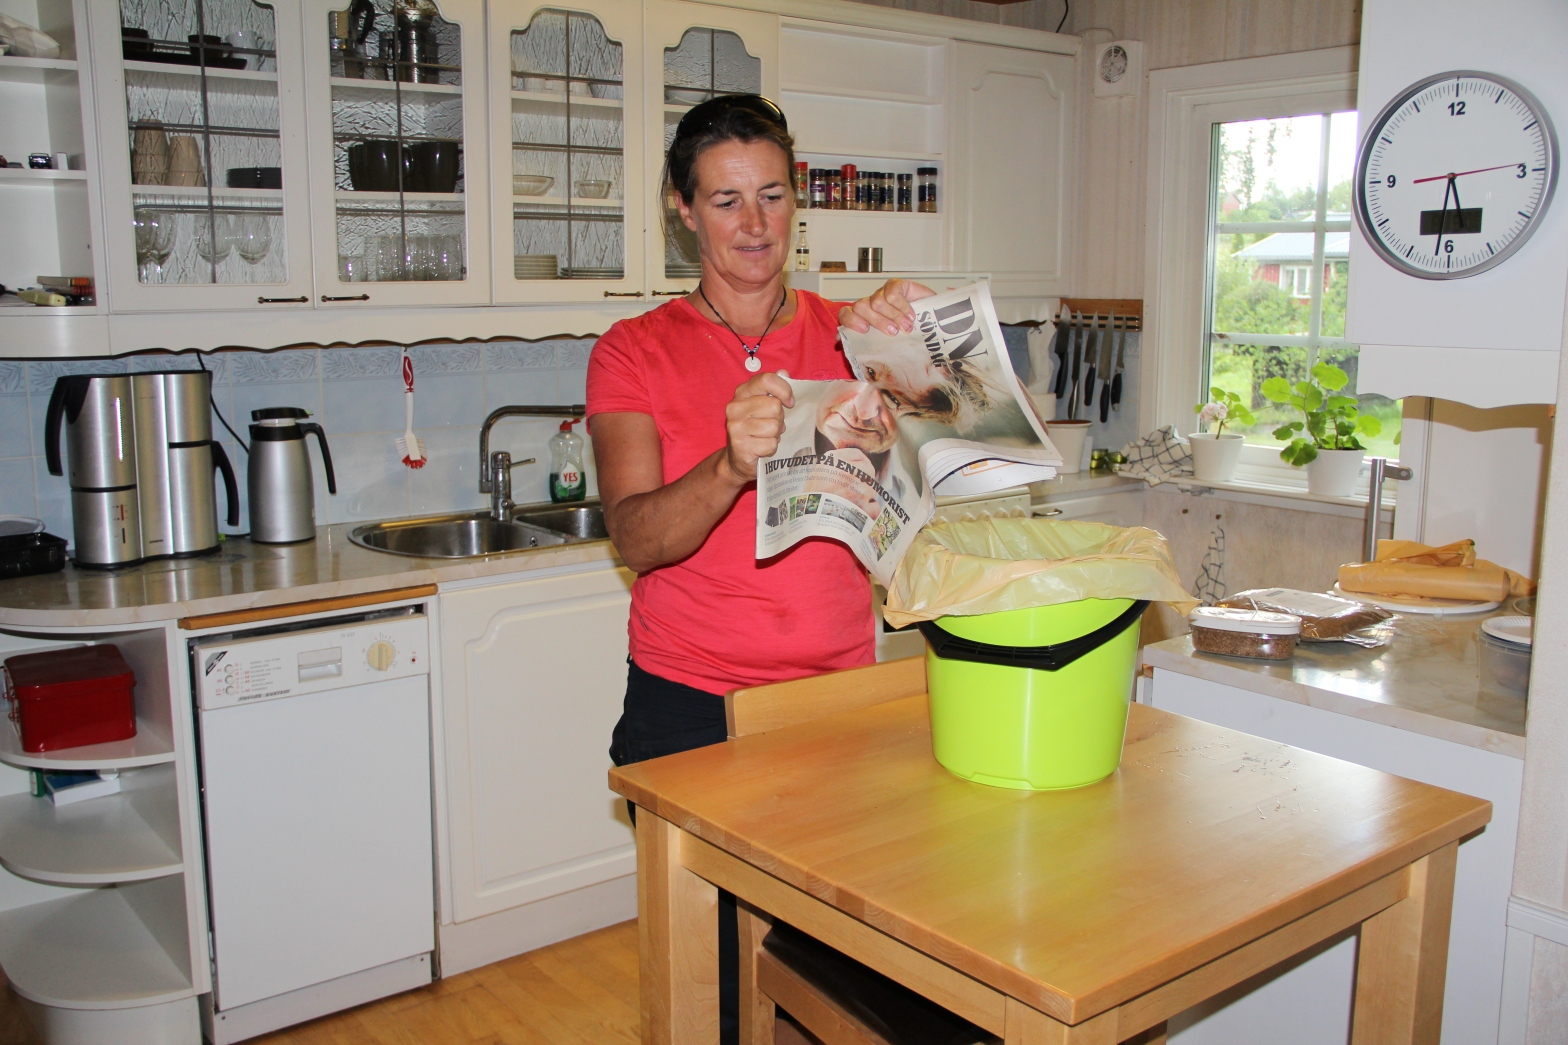
Been meaning to post these pictures for ages! This is how we do DIY buckets in Sweden. It just doesn’t get much simpler than this! Plastic buckets with a neat lid and newspaper to take up the liquid.
The buckets are standard off-the-shelf buckets — local manufacture and you’d probably find one in every home here. The lids for this particular brand (Nordic Plast if you’re a Swede) fit well, nice and tight and are easy to peel on and off. You’ll need some Bokashi bran and some newspaper. That’s it.
The pictures pretty much give you the idea. Tear a newspaper in half and put the two bits in the bottom of the bucket. Aim for a thickness of a centimetre or so first time round, you’ll get to learn how much you need pretty quickly. Sprinkle in some Bokashi bran, layer your food waste as usual with a sprinkle of bran on each layer. This system is based on absorbing all liquid so use your common sense — wet food = more paper. Serviettes and kitchen paper are great, just toss them in when you scrape the dinner plates. Midway up the bucket you can add a bit of newspaper if you wish, it’s a good chance to give the whole bucket a good push down with your hand when you have a clean surface. A section of newspaper on top is a good idea too, takes up the condensation.
Yeah, I know, you’re probably a bit sceptical at this stage. We were and so have a lot of others been. But give it a go and find out for yourself! You may have to give it a couple of goes to get it right, but after all you haven’t got so much to lose. If you’re curious about how much newspaper would be needed you can do a simple test in a baking pan or something. Put in a section of newspaper and pour in a litre of water. Then another litre. Then another… I was really surprised how much liquid the paper takes up. But of course, how much you need in your bucket depends on what you’re throwing out. A lot of fruit and salad and you’ll get a “juicy” bucket, a lot of bread and pasta and you’ll get quite a dry one.
The process from then on is the same as in a shop-bought bucket with tap. Fill the bucket. Let it stand nice and warm for a couple of weeks to ferment. Take it out into the garden and do something good with it!
We have tested these buckets with bio-bags inside as a liner. Some people like the idea, others not. It depends quite a bit on what kind of biobags you get, the thin ones tend to be a bit flimsy but should theoretically break down faster. If you can get hold of slightly thicker ones they can make great winter storage, just tie up the bag carefully when it’s full and store in a barrel, box, crate or whatever till spring. (Be on the generous side with the newspaper and stuff if you’re planning to store your bags for some months.)
The bags themselves take longer than you’d think to break down in the compost or garden, whatever the manufacturers say. But on the plus side you can tie up the bag and drop it into a trench in the ground (or the compost, or a big planter…) and not have to see the food again, so the ick-factor is definitely lower. Bokashi buckets are not hard to spray out, but bio-bags do keep them cleaner. To speed things up a bit (a lot!) it’s worth slitting up the bag when you bury it. That way the process gets going immediately and you’ll have soil before you know it.
How about all this newspaper in the garden or compost or whatever? If you’re running a compost it’s actually a good thing. The trick to a getting a happy compost is a nice balance of carbon and nitrogen. Often referred to as brown and green. Your kitchen stuff is “green” — a nitrogen bomb. The paper is “brown”, pure carbon. The two things together will do great things for your compost.
If you’re digging down the buckets directly the newspaper can be a bit of a pain. The worms like it ok, but it does take time to break down. You’ll probably find yourself picking blocks of compact newspaper out of the garden now and then and tossing them in the compost. You can always lay them in a bed under some leaves or grass clippings as mulch, keeps weeds at bay and the worms love working away under the paper. The paper is also drenched in microbes, so it’s a good way to get a little colony going in a new spot.
Of course, you don’t have to have special green buckets to do this. Any bucket with a tight-fitting lid will work fine. Pizzerias tend to toss big white catering buckets out by the dozen. Free to a good home and no cost. They sometimes have lids that are a bit annoying, but what the hell — you can have as many buckets as you like and just stack them up until spring.
The only big minus with this system is that you don’t have a tap. Therefore you don’t get the marvellous Bokashi liquid. So if you’re a gardener you’d probably only want to use these newspaper buckets as a secondary system. Or a winter system. Or a system to collect in organics from your friends and family (this is a great solution for the office).
On the other hand, if you’re not a gardener it’s quite nice not having the tap. No buckets to drain, no juice to dilute and run around with. Much easier bucket washing. Much cheaper.
So this is just an idea. Tried and tested and ready to use. Anytime you’d like!

Now that’s interesting! Thanks for posting.
We just finished filling our homemade Bokashi buckets (nesting 5 gallon buckets – we drilled drainage holes in the bottom of the inside tub for tea collection). We found that it produced way more tea and also began actively fermenting much faster than our custom bin. I’m also happy to report that this composting process reduced the volume of our compostables by about 60%, so we should have enough room in our drum composter to keep adding material until the thaw. No digging required. Woot!
Ha! Good to hear Desi. Sounds like this will work for you, even in the winter. Despite the stumbling about in the snow… 🙂
There’s a good chance that the Bokashi will help kick start your drum composter, let us know if you thinks it makes any difference when things start to thaw. Just to get the volume down is a victory!!
Interesting, bokashi bins are really a good way to do selective sorting, less trashs, beautiful plants and vegetables, no need to use pesticides…That’s great!
Cecile
Great, but very simple!
I’ve also just created my own diy bucket, 2 x 20 litre buckets with holes in bottom and a tap. Only time will tell if this will work ok. If not, I may try the one bucket + newspaper set-up.
Keep up the good work!
Why not try both :-)!! Your bucket is sure to work. There’s only two things that really matter and that’s that your bucket is airtight and that you keep it as dry as possible. If you have condensation inside the lid chances are your bucket will be smelling more than it needs to. That’s just a comfort thing, the contents will still be fine.
Use the minimum amount of bran you can (often enough with 1-2 tablespoons per day), adding a whole lot more won’t make a lot of difference. Although it’s always a good idea to sprinkle on a bit extra if you have something heavy on the go, meat or cheese or something, or if you’ve not added something to your bucket for a while.
So good luck! Let us know how you get on!
Jenny
Thanks Jenny. I have been trying to research Bokashi for days (only just found out about it when I was looking for a kitchen compost system – yes I have been under a rock! Working long hours actually).
I had decided to get some double buckets, but your system sounds like I get to start NOW not when I find buckets. (Both sound great and simple – I already have all the complicated I need).
Everytime I google Bokashi I get the commercial ads and gardeners showing how to use them, or the wonderfully experienced making 50lb pages of homemade mix. Your blog is a breath of fresh air for me. Thanks again…I already have scraps in an ice-cream container, so I just need to get some powder and START.
Maybe, I will begin to make my own powder down the track if I don’t want to keep buying the commercial product.
But for now, very happy! It is nice to find you and best wishes to everyone with their bokashi and their gardens.
Kerri
Good on you Kerri! Sometimes the only way is to think like Nike and Just Do It.
Honestly, this simple bucket system works really well. The secret is keep it airtight and keep it dry. Dry-ish at least. You can use paper (newspaper, egg cartons, toilet rolls), wood pellets if you have them, hay pellets if you know anyone with horses, cat litter if you have something made of natural materials. Whatever, just so long as it takes up the juice and you’d like to have it in your soil.
Then you could keep an eye out for a couple of plain buckets that fit tight in one another and drill holes in the inside one. Down the track. If you feel like it 🙂 The end result will be exactly the same but you’ll get hold of the juice (which really is just great for pot plants and in the garden).
We’re great believers here in the simpler the better. Probably that’s an excuse for being quite lazy… But why make things complicated? Life’s too short…
Good luck with it all! And if you have any good ideas we could share here let us know!
Jenny
Wow, how the world has changed since I left the last comment four days ago. I’ve gone from ‘what’s this’ to ‘this is what’ and it’s all in place.
I’ve read a lot before I found your blog and facebook page.
I’ve read a lot after that.
But, I’ve got to say thankyou Jenny.
I’m already doing Bokashi – no problems, no smells, easy as.
I’ve got my worm farm operational again after a previous fail.
I’ve got my compost working better after it got soggy.
I’ve trimmed the weed tree hanging over my backyard and blocking sunlight to my vegies.
I’ve had my mulcher out and turned the prunings into lovely leaf mulch which will come in handy to top up my sheet mulch.
You have to take the blame for this transformation and probably a few I’ve still got up my sleeve.
I’m feeling slack because I haven’t got to my initial project of doing an inground system for doggie doo… and it’s 2 days since I’ve done any work. (Don’t even have enough rubbish in the house to take the waste bin out…LOL)
Wow, good on you Kerrie!! Now you’ll have to take responsibility for making the rest of us feel really, really lazy!!
But it’s fantastic to hear it’s falling into place for you. I’ve reflected on the same thing so many times, that Bokashi is a missing piece of the puzzle. It makes things easier if you just use a little bit of imagination, and in many cases I think it helps matchmake different sets of problems so they become each others solutions. As in food waste is a problem, crap soil is a problem, good fertilizer is hard to get, we just need to experiment a bit and think new.
Think about it on a global scale and it’s enough to make you religious. How come we don’t all do this?
Anyhow, longing for spring here too so I can get out MY mulcher!!!
/Jenny
Jenny, if the cold is keeping you out of the garden so you have time to write incredible blogs and get us newbies up to speed, I’m selfishly pleased. I do think that people who need to fight for their homegrown treasures (whether it’s heat, cold, finances, soil and water difficulties, etc) do get very versatile. The need to store over winter in Sweden (and Alaska) has just opened up Bokashi to many more people across the world, because of the simpler and cheaper way to do it. PS I used to have a block worth getting the mulcher out for; not big, but lots of pruning (and all the neighbours loved telling me, “we’re pruning, come and collect”)
Take care and keep on innovating
Kerri
Thanks Kerri! (And sorry for spelling your name with an e before). Really appreciate your encouragement 🙂
/Jenny
Hi. I did try doing the Bokashi bucket. Bought a transparent and thick plastic bottle. It’s been more than a month, and I can see that the veggies have not really turned into soil. And once, I used a mineral water bottle. Sealed it, but someone accidentally opened it the following day, and it sort of popped or exploded. What did I do wrong? What happened? Thanks a lot if you can give me advice on this.
Hi Terisita, Bokashi is a two part system.
Firstly the scraps are put into a suitable container with a tight fitting lid (if the container doesn’t have a tap to allow liquid to be taken off, extra absorbent material will need to be added). Waste is pushed down to exclude air and Bokashi bran or liquid is added which introduces a group of beneficial bacteria, yeasts, etc which will ferment the waste. Leaving the waste in a bucket for at least 2 weeks will allow this ferment to occur. At the end of this time, the waste will not look much different to when you put it in there, but it’s internal structure has been completely changed by the microbes acting on it.
Secondly, this fermented waste is buried and it is only under these conditions that the decomposition continues to turn the Bokashi ferment into soil. This might take a few weeks to a few months depending on local conditions (weather, etc) and what sort of waste (soft foods will be gone in no time, egg shells and bones will be there for quite some time).
I’m not an expert by any means, but I doubt that the micro-organisms would thrive in contact with light so I wouldn’t use a transparent container. I would be pleased to hear from others on this point (always learning).
I’m not sure why your “mineral water bottle” popped, but if air was building up there is a chance that the waste was rotting, not fermenting. Bokashi works best with ‘fresh’ scraps. Once decomposition has started by rotting food it would be very difficult for Bokashi to turn that around to a ferment.
This blog page and another one of Jenny’s blog posts https://bokashiworld.wordpress.com/2012/02/11/bio-bags-dead-easy-and-a-great-way-to-do-bokashi/ explain how you can use the same system but line the bucket with a bag. This not only frees up your bucket to use immediately, it is also easy to store bags in a drum etc while they ferment and bury them whenever you like.
You are more than welcome to ask questions here or on BokashiWorld on facebook. Jenny and others will try to help as we are all learning together. Once you understand the basics, you will find Bokashi easy.
Hope this helps a little.
Kerri
Hi Kerri. Thank you so much for the very informative reply. I placed the transparent and sealed bottle in a dark place. I’d remember to use a dark bottle next time.
It’s nice to know that there’s you to enlighten me about Bokashi.
Thanks again.
You are most welcome, Teresita.
I’m interested in the idea of using a bottle for Bokashi. I imagine the bottle has a wide enough mouth for you to be able to put scraps, absorbent material and Bokashi bran in and to push them down. How do you get waste out to bury it? I guess you cut the bottle open?
Keep us updated with your Bokashi adventures and remember we are here if you have questions or want to bounce ideas around.
Kerri
Hi again Kerri. Hmmm. . . I have to clarify something. I did not use Bokashi bran as I didn’t and still don’t know where to get them here in the Philippines, but I used sawdust. In the other bottles, I just put the fruit and veggie scraps. I have not opened any. I am actually afraid to open or slice a bottle open because I’m not sure what’s going to happen. Remember, the ‘explosion’ when I accidentally opened a bottle the day after I made a Bokashi bottle? I was thinking. . . the longer I keep them sealed in, the better?
Thanks so much for the quick reply. Take care.
Hi Teresita, I am glad to be of assistance. Bokashi uses Effective Micro-organisms (EM) which is a product developed by a Japanese scientist, Dr Teruo Higa. This product is then added to some medium (often bran or rice husks) where it can multiply and then lay dormant until it is added to waste. The micro-organisms then again multiply and act on the waste to ferment it. When buried in soil it will continue the process to decompose the waste completely.
I think if you Google “buy Bokashi bran” or look on your local e-bay or other on-line sellers, you might find someone who sells the inoculated ‘bran’. I have gone to Dr Higa’s site EMRO and found their partner in the Philippines. This is EM Research Philippines Inc. You could email them on hiro_ono@pldtdsl.net and they might be able to help you find a distributor of Bokashi bran.
You would be best to have a look at a few sites or you-tube videos about Bokashi.
Here is one from a commercial seller of Bokashi supplies. http://www.bokashicycle.com/videodvd.html However, there are many ways to save money (like using a homemade bucket with or without a tap, or using Jenny’s idea of a simple lidded bucket or even Jenny’s idea of lining the bucket with a bag). It is possible to buy the EM-1 product and inoculate your own bran, but this would be something to do later, once you understand the system and know you are going to continue with it.
The word Bokashi is used for lots of different applications and for different steps in the process. When searching you might find better information if you add the word kitchen or scraps.
All the best. Hope this information sets you on the right track.
Kerri
Thank you Jenny for the excellent blog. So well written. Comments from other readers have been very helpful.
Thanks yourself for the compliment Lea! Feel free to add a few comments of your own in due course — the more we learn from each other the better. Cheers! Jenny
Hi
I’m also researching the internet about the bokashi composting in a less expensiv way (buying EM, bran, buckets, etc). You can make your own fermenting solution with rice water and milk and don’t even have to buy the bran. Look up the website of Gil Carandang.
Happy composting.
Chantal
Thanks for the tip. Although I suspect it will always work better with the EM microbes, after all they’re the ones that do the work!
/Jenny
I, too, have found a lot of different ferments and compost teas, etc in my research.
I think if someone is creating great soil microbe populations and has the knowledge, the time and the equipment to do so, that is fantastic. A lot of people have success with only one or two components or all the components, but in their own ratios.
Bokashi (for me) is a set of microbes balanced in a way that you can just put anything in the ‘compost’ bucket. The Bokashi catch cry at my house is, “yep, that too!”. Meat, fish, cheese, citrus, paper plates, leftovers that have mayo or gravy on them. My bin is literally empty of anything but plastic packaging (another story).
Bonus that these microbial populations are just what the soil needs, too.
I just adore the way Bokashi isn’t something gardeners and greenies do, (or something only the gardener or greenie in the house knows all the rules for); it is something everyone can do, anywhere, anytime.
Using newspapers is a great idea Jenny. I tried using bagasse, but found it bulky and difficult to handle.
What’s bagasse? Just curious! Hope the newspaper idea works for you, they’re something pretty much most of us have on hand. Depending on what you have available you can try anything that’s dry and absorbs a lot of moisture. Sawdust, egg cartons, dry peat, coconut fibre…the list is long!
Bagasse is usually the fibre left over from sugarcane pressing. I would love to have access to some for my bokashi! There is still a lot of sugar left in the bagasse, so I would image the bacteria and fungi would love it.If coconut coir works, I have to assume that bagasse would be even better! Maybe the amount and size of the bagasse fibers needs to be tweaked.
Aha, so that’s it. Sounds like the perfect resource if you happen to have it around you. Thanks!
/Jenny