
Got a great mail the other day from Vin in Florida, “a Florida backyard gardener who loves feeding her garden soil”. She included a bunch of pictures showing the Bokashi experiment she’s been running the last few months. (Can’t help but envy all that green while we’ve just been looking out at nothing but white for months!) The really fun thing with this experiment (apart from the healthy worms and plants of course) is the simplicity of it all. Why make it complicated when you can make it easy? Way to go, Vin!! /Jenny
My Bokashi Experiment began in Oct 2012. Pics here taken Nov 8/12:
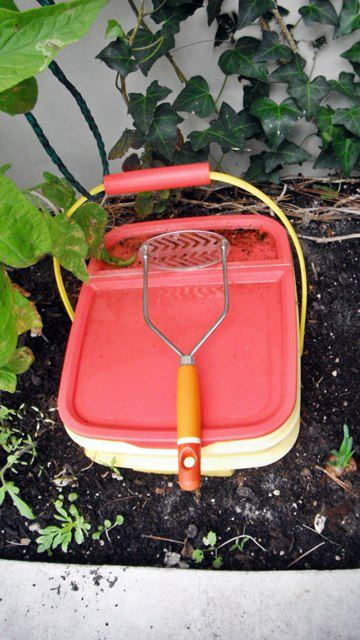
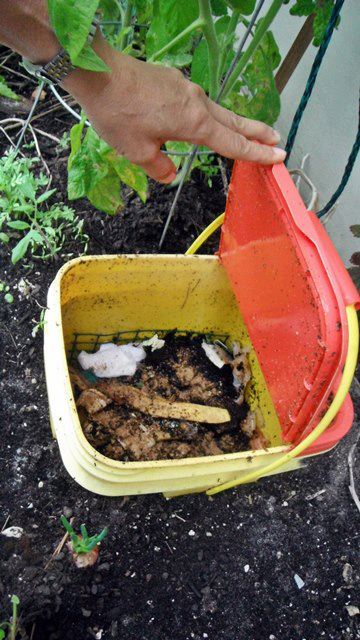
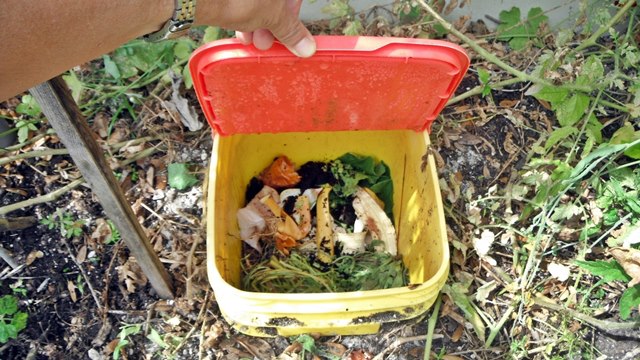
This bucket is buried in a bed created by a concrete retaining wall.& I combine kitchen waste & garden leaf clippings in layers. Each time I put in kitchen waste (including paper napkins) I sprinkle bokashi bran. I call this my Garden Bucket. I use a potato masher as my push down tool. Notice (in the pic) above the bucket is a tomato plant and on the left bottom is a small onion shoot. On March 1, 2013:
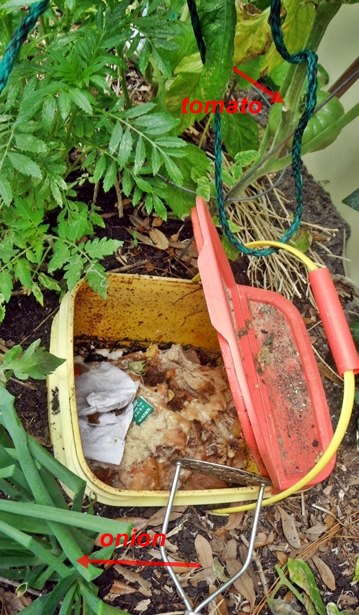
This the same bucket in the earlier pic of Nov 8th. I have not emptied it since starting as the level goes down very fast & of course no need to drain, etc. The plants around seem happy – tomato has borne nice big fruits (1 on lower stem right next to the bucket) and the onion has grown tremendously (I cut onion greens often to use in salads & soups). Even the marigold, which I use as pest deterrent, seems to like the “food” here. So, since I have found this concept working for me, I have put more ‘bokashi buckets’ in my backyard. This is on a bed I am re-doing, incorporating some wood branches like hagelkultur, which will be for a combination of tomatoes, beans and vines… maybe squash.

4” of topsoil & composted manure will be put over the branches but leaving the bin top accessible, so I can continue to add kitchen waste. I’ve also put 1 in a ground-patch, between 2 path pavers.
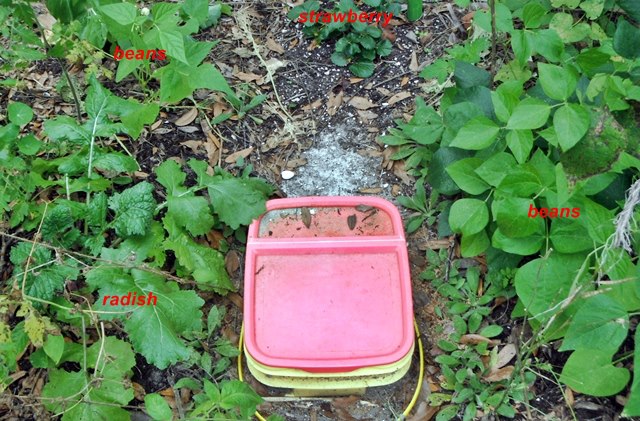
Plants around have survived the Florida winter and seem healthy. There is also a 10” papaya seedling about 4ft away from this path & I’m hoping (if it survives & grow to late spring) the roots will reach close enough to get some nutrient from this bucket.
I’ve prepared a “spare” bin in another bed & I have put some earthworms around it. When this weekend’s chill front is over (hopefully the last 1 for 2013) I may plant some peppers and jicama around it.

Hi, can you tell me, does this bucket have holes in the bottom of it? If not, where does the liquid go? Very interesting concept. thanks…. LuLu
Hi there! Yes, Vin has drilled holes in the bottom of the bucket so it is self-draining. Makes life easier doesn’t it? Perfect for a warm climate at least. And you’re in Hawaii, right? (Lucky you!! I’ve got -15 degrees C at the moment and it’s supposed to be spring!) /Jenny
What a great idea! We are all working very hard to not have to work so hard. This method will suit a lot of people and especially those who have given up using their bucket for whatever reason and still have it in the shed.
I would imagine the amount of bran needed would be less as the population of good guys in that bucket, and the surrounding soil, must be incredible. A ‘bottomless’ bucket would be easy to move, but it might also be preferable to keep it in one convenient spot.
Too easy! Thanks for passing this on. Please pass our regards to Vin for the wonderful work done testing this method.
hi,
I’m just getting started in Bokashi and from what I’ve read, it seems that it’s always stressed that the bucket should be airtight. If this bottomless bucket is buried in the ground, that means that it’s not airtight right? And yet, it works? Must the bucket be buried in shade or is it ok in the sun? Thanks!
Hi! Great to hear you’re joining the Bokashi movement, the more of us that get going the better. The normal process is a two-step one, first an airtight bucket then the soil-making process (dig down the contents of the bucket). So this process of in-ground Bokashi is a bit different, but a lot of people have tested in different countries and had good results so why not?
A bucket in the ground is airtight enough, it needs a lid and if you can throw in a bit of soil now and then you’ll help the process along.
Shade or sun? Depends where you live! Here in Sweden I’d definitely say sun, in a hot climate I guess a shady spot would be better. Try both and see what works for you! A lot of the fun with Bokashi is testing this and that, it sounds like there are a lot of hard rules but really it’s not that inflexible. After all, what’s the worst that can happen?
Good luck and let us know what you find out!
/Jenny
hi Jenny,
Thanks for your reply. I’ve been reading your blog since finding out about bokashi. It’s been very helpful!
I just started our first bokashi bucket and this in-ground bucket method sounds interesting to me. I would love to try it if I can find a spot to bury it in. Our California clay soil is really hard though so it’s tough to dig a large/deep hole. Maybe I can try a small container first…
Regarding the regular bokashi bucket, do you put in chicken skin, either raw or cooked? I know we can put meat and bones in the bokashi bucket but what about the skin?
Thanks!
Hi Olli, sorry for the slow reply. Been out traveling a bit (waiting for the snow to thaw, haha, it was all still here when we got home…) and it was all too hard with internet for a while there.
I know all about hard clay, there’s no point even trying to get a spade to bite. Just go up! Put your bucket-with-no-bottom direct on the ground and start filling. The soil underneath will eventually come right and you can start digging in it, but it takes time. I did an experiment some time ago with a banana box, just dumped it on some crap soil and started filling with Bokashi + whatever. Kept a plastic bag on top (weighted with rocks) to keep the dog out. After a while the soil in the banana box was good enough to plant in and at the end of the season I just left the whole thing where it was to fall apart. Cheap and easy way to improve a bit of tough soil! The boxes hold their shape for the season. But it depends what kind of garden you have, we have a lot of space so a few banana boxes don’t look as silly as they might in a small yard.
As to what goes in the Bokashi bucket — everything! Raw, cooked, skin, bones, whatever. Makes no difference as long as it’s some kind of organic substance. Bones do take longer to break down though so some people choose to leave them out. Personally I think they add good stuff to the garden in the long run so they’re good to have there (and I’m too lazy to pick them out!). After a while in the soil the bones tend to get quite brittle and you can easily smash them to powder with a rock or a hammer or whatever you have handy. Or else you can just push them down into the soil again and forget they’re there…
Just test your way forward and you’ll soon see what works for you. Good luck there!
/Jenny (who would love a bit of your California sun!)
hi Jenny,
Thanks so much for your reply and advice.
Our first bucket is full already and I’m waiting to get it into the garden. I’m curious as to how that will turn out. I’m using an ordinary bucket with no spout. But I did put peat moss and shredded newspaper at the bottom to hopefully soak up any juices. So we’ll see….
Yes, we’re blessed with amazing weather in California!
Olli
This would work great for preparing a spot where you want to plant a tree or bush. The in ground bucket with something growing around it for pulling nutrients to the surface from deep down. I’m thinking comfrey. After a year, pull out the bucket, cover with soil, mulch with wood chips, let it sit for a few months. Plant the tree.
I’ve talked myself into it!
Good to hear!!! The less digging the better I reckon, why make things complicated when you can make them easy? Let us know how you get on! /Jenny
OMG, I love this idea!
Thank you to Olli for asking her question. I have the same problem with heavy, clay soil, which is why it’s so hard for me to bury my Bokashi even though I do have a backyard. I can’t do it myself, and hubby has a really tough time of it, too.
If I do place bottomless Bokashi buckets on top of the soil, will they attract animals? We have plenty of squirrels and the occasional neighbour’s cat coming to our yard all the time.
Thanks in advance!
Hi Alexis! I just put up a picture on the Bokashiworld facebook page of a similar cut-off barrel arrangement here at home. I’ll blog about it soon, promise!
But basically it was an old water barrel that had sprung a leak. We sawed off the bottom and it happened to sit perfectly on the top as a lid. With a nice heavy rock to hold it in place. I just sort of screwed it down into the garden bed and started dumping stuff in it, Bokashi obviously and some paper scrap and garden clippings that needed a place to go. No great plan in other words. I’m thinking of planting a pumpkin right alongside it to take advantage of the nutrition.
I wouldn’t expect any trouble with animals (we have all sorts here too!) as it’s screwed down into the soil and has a lid. If you have trouble with moles it could be worth putting down a grid or some net first.
Otherwise good luck!
Jenny
Hi, this coming autumn I want to build a keyhole garden ready for next spring. This will have a compost pile in the centre. Living in Nagano Japan our climate is similar to yours, (perhaps spring starts a little earlier) and I wonder if you have any thoughts about the best way to manage a keyhole garden?
Hi Graham! You’ll have to lead the way on this one! I hadn’t even heard of keyhole gardens until recently when a guy from Arizona posted a picture on our facebook page. But it sounds like a great idea.
I guess my only thoughts would be the usual, as many layers as possible in the “hole” (think lasagna) so it’s easy for the process to do its work. If you’re only feeding it with Bokashi I’d go for a layer of paper scraps now and then to dilute the nitrogen a bit and give the worms a change of diet. But this is just guesswork. Can’t you take some photos and give us a beginners trial-and-error guide to keyhole gardening in Japan later?
/Jenny
…and by the way, lucky you living in Nagano! Temporary or permanent? Given that Bokashi is a Japanese thing you should be able to get plenty of local advice.
Hi Jenny,
We moved to Nagano 3 years ago and have decided to settle here. Last time we lived in a house was 15 years ago in Kagoshima. We never beat the weeds there! Turn your back on them and they have shot up about a metre. After that we’ve moved around a lot living in Kyoto and Osaka.
I take the point about layering and if it all gets off the ground I will keep you informed. The local council here provides bokashi supplies but the bins and bran are easily available in most garden centres and DIY stores.
Good luck Graham! Let us know how you get on — weeds or no weeds! Love to hear more about Bokashi and EM in Japan from a local point of view — because of the language it’s hard to really get to know a lot about how what’s happening there in Bokashi heartland. There must be a lot we could learn from. Enjoy the summer! /Jenny
Reblogged this on Temasek Garden and commented:
Hi Jenny,
Found your WP blog by chance & posting it onto my blog as a fun reminder. Thanks again. Vin 😀
Thanks yourself, Vin! I think a lot of people have been inspired by your ideas so thanks for sharing. Simple is the way to go!
Question. Can the liquid from the Bokashi bin tap be poured over the latest additions to the bin along with the bokashi starter mix, and would it aid the infusion of the bacteria into the new food ? Thank You. Tim.
Hi Tim. Yes, quite a few people have tested that here in Sweden and think it works quite well. It’s best to wait until you’ve done a few buckets the “correct” way so you have a good feel for things. There’s two things to relate to: one is that the liquid will make the contents of your bucket wetter, and that might cause other issues. The second is that you still need the bran to keep the recipe on track.
A lot of people ask if they can use JUST the bokashi liquid and skip the bran. That doesn’t work, because the liquid doesn’t have exactly the same balance of microbes as the bran, it will vary from batch to batch. What you can try is to start each new bucket with the proper bran, then use the juice from that bucket (or the previous) in combination with the bran, exactly as you suggest. Not sure it speeds anything up, but some people do it as a way to decrease their bran usage. Test it out and see!
/Jenny